Decades ago, tooth loss was an issue that stayed with the person for the rest of their lives. Nowadays, it can be easily treated with the help of dental implants. In the second part of our series we focus on the process of implantation. We also mention healing times, aftercare, and what exposure means to a dental surgeon.
In the previous article we discussed what dental implants are, and when bone substitution might be needed. This brings us to the most important part of the treatment: the surgery. Dr Máté Kelemen will be our guide once again. First and foremost, he would like to reassure everyone about how painless the procedure is. “To be fair, implantation is just a small oral surgery. Most of the times, it is done under local anaesthesia. When it comes to inserting several dental implants at the same time along with bone substitution, we recommend general anaesthesia. This is only because the immense amount of anesthetics that would need to be inserted locally. The point is: whether local or general anaesthesia, the patient’s experience is absolutely painless.”
Not longer than a lunchbreak
Here is a rundown of the procedure itself. Remember, you won’t feel any of this, and you can even listen to your favorite music if you’d like. The first step is always an incision on the gum. Then the gum itself is then separated from the bone. Once this is done, the surgeon drills a small hole on the bone. “Using a special drill, we create a hole in the bone, so we can insert the titanium screw (implant). After this, we simply stich the gum together.” Inserting a single implant doesn’t take longer than 20 minutes. More complex cases -involving bone substitution- may take up to 30-60 minutes.
Guided implantation – unique template for everyone
We at VitalEurope like to use the most recent digital technologies to make treatments easier and quicker. Implantation is no exception. “We started doing guided implantation recently.” says Dr Kelemen. “First, we import the patient’s CT scan into a program. We determine the future position of the implants, and design a special tray with holes. This tray is used during the surgery, so the implants are inserted exactly to their pre-determined position. Guided implantation also means there is no need for incisions and stiches. This technology can be used in every case, and makes the treatment and healing a lot quicker.”

Okay, but what happens once the anaesthetic wears off?
Let’s be honest, most people are not afraid of the dentist, but the pain that follows the treatment. Implantation may sound scary, but the aftermath is as painless as the surgery itself. The face might be a bit swollen, but there is no pain, only a slight discomfort. These can be both treated easily with icepacks and a few painkillers. The stiches are removed a week after the surgery. During this period, the patient must pay extra attention to oral hygiene. It is also recommended to consume softer foods, and to avoid dairy products and fizzy drinks. Usually it takes up to 3-4 months for the implant to fully integrate with the jawbone. This could go up to 6-9 months, if the patient also received bone substitution.
Implant exposure – the penultimate stage
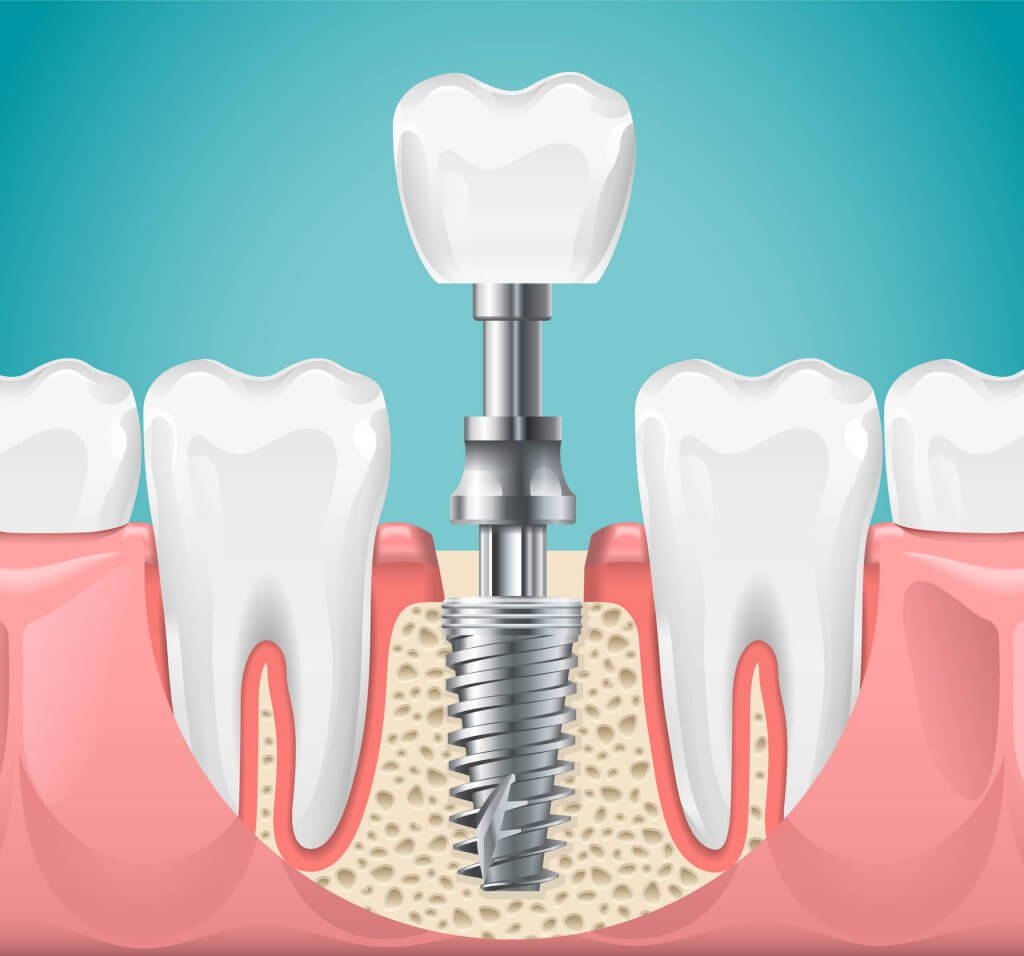
By the end of the integration period, the implant becomes part of the jawbone. The primary stability of the implant is set during the insertion, and can be checked with a special equipment after the healing period. This works like a torque wrench, that gives a result on a scale from 1 to 100. Anything above 80 is a perfect integration. During the implant exposure the surgeon makes a small incision on the gum, just above the implant. A titanium abutment is then placed on top of the dental implant, which will stick out of the gum. The purpose of this abutment is to make sure that the gum heals around the top of the implant, providing a natural looking gum line later on. 2-3 after the exposure, a crown is placed on top of the implant, finalizing the tooth replacement.